Thunderbolt Series:
In order to connect to Thunderbolt devices, you need to ensure your computer has a Thunderbolt port. For example, if your Mac or PC is prior to year 2010, it would not be a Thunderbolt enabled computer. See more information here:
http://support.apple.com/en-us/HT204154
Below are some of the steps to possibly resolve your Thunderbolt device detection issues quickly:
A. Try a different thunderbolt cable
- If possible, please try with different Apple Thunderbolt Cables, or reverse the direction of the cable.
B. Please make sure your OSX is fully up to date, then verify and repair your OSX permission. When finished, please reset your PRAM and SMC 3 times in a row. (http://support.apple.com/kb/HT1379)
- If you are running MacOS 10.8, please make sure to download “OSX 10.8.5 combo update” and “OSX 10.8.5 supplement update”, same goes for the “OSX 10.7.5 combo update”
- Make sure all EFI and SMC firmware updates are applied.
C. Power ON
- Thunderbolt devices need to be connected to a running computer through the Thunderbolt port.
- If your computer is NOT on, the Thunderbolt device will not run.
- If the Thunderbolt device is not connected, it will not run either.
- The best method is: power ON your computer first, then connect the Thunderbolt device to your computer. After that, please turn ON the Thunderbot device if there is a power switch on it.
D. Try to move the Thunderbolt device to the front of a Thunderbolt chain.
- If you are daisy chaining a new Thunderbolt device, please try moving it to the first Thunderbolt device in the chain.
- Try a different wall mount or outlet for the Thunderbolt device AC adapter as well.
Performance Map & Product Comparison:
2. CalDigit RAID Card vs other MacPro RAID card (PDF)
3. CalDigit HDElement vs G-Speed eS (PDF)
4. CalDigit HDOne vs HDPro vs HDPro2 (PDF).
5. CalDigit HDElement vs Fusion D400RAID (PDF)
6. CalDigit HDOne vs Fusion D800RAID (PDF)
7. CalDigit AV Drive vs G-Drive (PDF)
8. CalDigit Warranty FAQ
General Information:
CalDigit RAID Card & HDElement:
2. I am encountering gray screen while bootin up the OS from the RAID card?
3. I am unable to see the RAID card in RAIDShield?
4. I created a joint array via my CalDigit RAID card and HDElement, how come it is not showing on the desktop?
5. How come my RAID card is not recognizing the HDElement?
HDPro, HDPro2 and HDOne:
2. What is the capacity loss, when the HDPro is set to RAID 5 or 6?
3. What is the useable capacity for HDPro 2.56TB?
4. Unable to recognize HDPro during setup in Mac or Windows machine?
5. Unable to launch RAIDShield?
6. RAIDShield can see HDPro but drive is not in Windows Disk Management?
7. How to create larger than 2TB single RAID set in HDPro for windows XP?
8. How to add a redundant power supply to your HDPro Tower?
9. Unable to install HDPro's driver in Windows Vista 64-bit? (Disable Driver Signature Enforcement)
10. I would like to use the HDPro with my PCI-X machine, can the HDPro be used with my machine and would I experience slower performance?
11. Unable to "Add Controller" in RAIDShield?
12. 2TB limitation under XP when using "MacDrive"
13. HDPro shows as a "unknown card" in Windows Device Manager?
14. I am experiencing slower performance when connecting with 10 meter or longer PCIe cable, what do I do?
15. My HDPro was working flawlessly before, but after I restarted my OS today, the drive no longer appears to mount, or show on my desktop, what do I do??
16. HDPro Cache Battery Backup Module Specification
FireWireVR:
S2VR Series:
2. Maximum memory usage in 32-bit Final Cut Pro is 2.5 GB
3. How to delete the Final Cut Pro HD preference files
4. Installation of FASTA-4e in Mac Pro
5. Delayed Response after recovering from sleep mode
6. My S2VR does not appear on my desktop?
7. Cannot Install FASTA-4e Mac Driver?
8. How to update S2VR Firmware?
9. Reliability of the S2VR series
10. Standard maximum length of a eSATA to eSATA cable
11. Can I install S2VR in G4 machine?
12. If a drive fails how quickly can the drive re-build itself?
13. I am experiencing dropped frames while using Final Cut Pro?
14. How to use different sets of drives in S2VR?
15. How to setup Window RAID for S2VR HD?
How come my CalDigit array only shows 5,588GB (instead of full 6000GB)?
The actual definition of "1GB" = "1,073,741,824 bytes", and it's NOT "1GB" = "1,000,000,000 bytes". Therefore, the calculation for 6000GB is: 6000 / 1.073741824 = 5587.94 which rounds up to 5588GB.
Most operation systems defines 'gigabyte' as 1,073,741,824 bytes. As result, this system do apply on any CalDigit or CalDigit related devices, and the 'capacity shortage' is not related to your CalDigit disk array's physical specifications.
I am encountering gray screen while booting up the OS from the RAID card?
If your Mac OS drive is installed and booting from the RAID card and
you experience a grayed out screen during startup, we recommend that you reset the PRAM in your computer.
To reset the PRAM, press and hold down the following keys:
APPLE + Option + P + R
Let the MAC cycle through powering off & back on 3 times in a row then release the keys. For more information on PRAM resetting, see Apple knowledge base
http://support.apple.com/kb/HT1379
I am unable to see the RAID card in RAIDShield?
If your computer is a MacPro and has built-in AirPort, please turn off AirPort and restart your computer.
I created a joint array via my CalDigit RAID card and HDElement, how come it is not showing on the desktop?
The most common root cause of this problem is forgetting to turn on the HDElement first before your computer.
If you login to RAIDShield, all the HDElement drives will have a "B" sign on the drive icon while the remaining drives on the RAID card or MacPro will have the "B" sign as well.
The array will show degraded as HDElement hard drives are missing from the RAID array. (See the picture below)
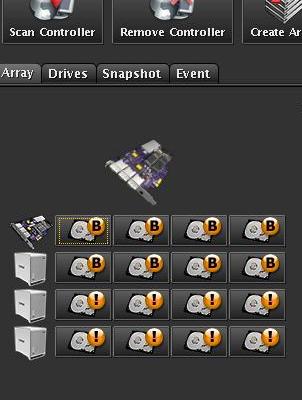
DO NOT unlock the degraded hard drives on the RAID card.
You can bring the array back online by simply turn off machine, then turn on the HDElement tnen your computer. Your drive will be up and running again. (See the picture below)
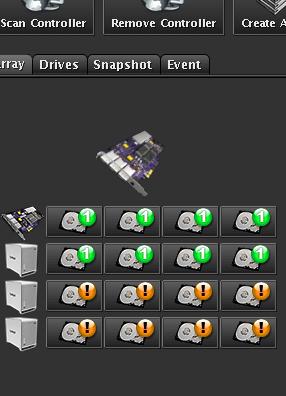
If you unlock the degraded hard drives on the RAID card, all metadata on the RAID table will be lost as the result of the broken array.
(See the picture below). If you encounter this situation, Please contact CalDigit Tech Support RIGHT AWAY.
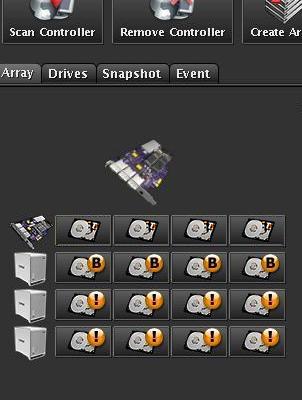
*** Please ALWAYS remember to turn on your HDElements before turning on your machine if you have joint RAID cross multiple HDElements.
How come my RAID card is not recognizing the HDElement?
Please check for the following things:
1. Make sure the RAID card is connected with the HDElement. If you have multiple external devices, please make sure our HDElement is connected to your CalDigit RAID card properly. The RAID card does not recognize other manufacture's storage devices.
2. Make sure the jumpers on the HDElement are corresponding to the external ports on the back of the RAID card. For example: if the HDelement jumper is set to 5-8, please make sure the cable is connected to the 5-8 port on the RAID card.
3. Always turn on the HDElement before the machine.
4. The HDElement should have a short 'Beep' sound as indication of connection being established. The left lights will change to solid green as HDElement booting up.
5. Please make sure the enviromental cable is connected properly as well.
6. Please check the power source. If you are running mutliple electroic devices on one single power surge, it might not be providing sufficient power to the HDElement.
What is the rebuilding time under RAID 5 for the HDPro?
Each 100GB requires 44 minutes of rebuilding time.
What is the capacity loss, when the HDPro is set to RAID 5 or 6?
Answer:
In RAID 5, the storage capacity will be 12.5% less than the total capacity.
In RAID 6 will be 25% less than the total capacity.
There are different schemes for different types of data safety and recoverability. For example, RAID 5 essentially spreads the data across all drives using parity so that if any single drive fails you won't lose any data. Because of this scheme, RAID 5 has n-1 drives storage capacity, you use one drive capacity to save the parity information.
RIAD 6 uses n-2 scheme. The parity information for any given block of data is placed on TWO drives seperate from those used to store the data itself. This is to protect your valuable data even in the event that two drives fail.
What is the useable capacity for HDPro 2.56TB?
Answer: 2,085GB under RAID 5.
1,787GB under RAID 6.
Unable to recognize HDPro during setup in Mac or Windows machine?
Troubleshooting:
1. Always turn on HDPro before your computer.
2. Make sure the proper HDPro driver is installed in your OS. You can download the latest driver from support page.
3. Re-connect PCIe cable.
4. Re-seat the PCIe card to different PCI express slot.
5. If the host computer is a MacPro, open the "Expansion Slot Utility", located in /System/Library/Core Services/ , give eLane card (HDPro's HBA) at least 4x lane speed, then restart your MacPro.
Unable to launch RAIDShield?
RAIDShield is a JAVA based application, you will need to install JAVA in your machine, please download it from the following links:
JAVA for Windows, Linux, and G5 machines
JAVA for Intel Mac
RAIDShield can recongize HDPro but drive is not showing in Windows Disk Management?
In Windows, if HDPro can be recognized in RAIDShield but does not show up in Disk Management, it is possible that Windows cannot see a storage more than 2TB.
For more information about how to configure HDPro in Windows, see
How to create larger than 2TB single RAID set in HDPro for windows XP?
Unable to install HDPro's driver in Windows Vista 64-bit?
(Disable Driver Signature Enforcement)
When installing HDPro's driver in Vista, you may encounter an error message requiring you to install a digitally signed driver like the following:

The following steps are to disable digital signature enforcement temporarily so that Windows Vista 64-bit will load an unsigned driver properly.
1. Restart computer.
2. Hit "F8" on startup.
3. Select "Disable Driver Signature Enforcement".
4. Install HDPro's Windows Vista driver.

I would like to use the HDPro with my PCI-X machine, can the HDPro be used with my machine and would I experience slower performance?
Yes, you can use the HDPro with PCI-X based G4s, G5s and PCI-X Windows machines.
Due to the limited bandwidth of the PCI-X slots, there will be slightly slower performance.
Results will vary on different machines, however we guarantee up to 10 bit uncompressed HD 4:2:2 workflow and
multiple streams of ProRes, DVCProHD 1080i.
If not sure whether your Mac machine is PCI-X or PCI-E you can enter your serial number to find specifications in the Apple database:
http://support.apple.com/specs/search/
Unable to "Add Controller" in RAIDShield?
Easy three step solution. Unplug your network cable, then, restart the computer. Run RAIDShield again and the controller will appear. If this does not work,
go to RAIDShield server folder - For MAC: OS Drive (Finder) > Library > StartupItems > RGX , if you see two RGX folders such as "RGX_CalDigit", you then need to trash "RGX_CalDigit" folder, then restart your computer.
2TB limitation under XP when using "MacDrive"
I've installed "MacDrive" software to enable HFS+ partition for the Windows XP, but Windows does not recognize my 2.56TB HDPro.
Although CalDigit overcame the Windows XP 2TB limit, "MacDrive" software cannot recognize storage that is higher than 2TB.
HDPro shows as a "unknown card" in Windows Device Manager?
If you have installed HDPro driver (msi file) in windows, and it still shows "unknown card", please download the following cat/inf driver and reisntall them.
HDPro Windows Driver
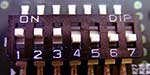
I am experiencing slower performance when connecting with 10 meter or longer PCIe cable, what do I do?
When connecting the HDPro with 10 meter cable, if you encounter slower performance, in the area of 199MB/s Read, 166MB Write, this is because of the setting on the eLane card. The default dip swtich setting is:
1, 2, 3, 4, 5, 6, 7: ON
In order to experience the best performance with the 10 meter PCIe cable, you will need to configure dip switch to:
1, 2, 3:ON
4, 5, 6, 7:OFF
My HDPro was working flawlessly before, but after I restarted my OS today, the drive no longer appears to mount, or show on my desktop, what do I do?
Normally, if there is no hardware failure, this is related to connection problem. Please do the following steps:
1. Turn on the HDPro.
2. Turn on your workstation.
3. When your OS is up, physically unplug the PCIe cable from the HDPro.
(While everything is on)
4. Turn off the HDPro and wait 10 secs.
5. Plug the PCIe cable back to the HDPro.
6. Turn on the HDPro.
7. Restart your OS.
How to configure FireWireVR drives in RAID1 (Protected Mode) properly?
Whenever you want to switch from JBOD, Performance, or Concatenated mode to Protected mode (RAID1)- you need to wipe out all the data and partition two drives separately. First under JBOD, then rotate switch to PROTECTED MODE.
For example, if you are in Performance mode and you intend to switch to Protected mode, you need to do the following:
1. Unmount volume and turn off FireWireVR.
2. Rotate switch to JBOD.
3. Turn FireWireVR power on.
4. Go to Disk Utility or Disk Management and partition these two drives individually.
(This is to make sure you have identical drives and contents before switching to RAID1.)
5. Unmount JBOD volumes then turn off FireWireVR.
6. Rotate RAID switch to Protected, then turn FireWireVR on.
7. Use Disk Utility or Disk Management to partition RAID drive.
Notes: Failure to follow this procedure may cause drive problems and/or data loss
FASTA-4e or FASTA-4x? PCI Express or PCI X?
Specifications of Apple Machine
http://support.apple.com/specs/
Enter serial number to find specifications
Database from Apple: http://support.apple.com/specs/search/
If you cannot locate your serial number, try chipmunk's database too
http://www.chipmunk.nl/klantenservice/applemodel.html
Maximum memory usage in 32-bit Final Cut Pro is 2.5 GB
http://docs.info.apple.com/article.html?artnum=93844
How to delete the Final Cut Pro HD preference files
http://docs.info.apple.com/article.html?artnum=93832
Installation of FASTA-4e in Mac Pro
Always put FASTA-4e card in Slot #3 or Slot #4 to obtain the optimal performance.
If you have capture card like AJA or Blackmagic Design installed in Mac Pro, you need to have different arrangement.
FASTA-4e + AJA: CalDigit FASTA-4e card should be placed in slot #4 and AJA card should be placed in slot #3.

FASTA-4e + Blackmagic Design: CalDigit FASTA-4e card should be placed in slot #3 and Blackmagic Design card should be placed in slot #4.

For more information about Mac Pro's PCI-E slots, please visit the following page
http://docs.info.apple.com/article.html?artnum=304122
The Expansion Slot Utility, located in /System/Library/Core Services/
Delayed Response after recovering from sleep mode
If you are experiencing this problem with S2VR drive or other SATA boxes, you can turn off "sleep mode" from Energy Saver.
Energy Saver:

Uncheck "Put Hard disk to sleep mode" and "Never put computer in sleep mode"

My S2VR does not appear on my desktop?
1. Check and make sure the host card is plugged in firmly.
2. Make sure the screw is tightened and locked securely.
3. Check the back of your machine, make sure all ports are level with the back of your computer.
4. Make sure Caldigit Orange SATA cable is connected properly with both S2VR and FASTA-4 card.


5. Make sure you have FASTA-4 driver installed in your OS.
6. Before install hard drives, please make sure they are in right sequence/slots:

7. If drives are not in right slot, you will see all white LEDs on and Blue LEDs flashing, please turn off S2VR, and put all drive in order (A0 - A4).
8. If you see all white LEDs showing on S2VR units, but there is no S2VR showing on OS, please restart both OS and S2VR.
9. For more information about how to install S2VR, please visit our demo page:
https://archive.caldigit.com/S2VRHDOnlineDemo3.asp
Cannot Install FASTA-4e Mac Driver?
When installing FASTA-4e driver, Installer keeps quitting with "try again" message and you cannot install driver properly in your Mac Pro, please check the followings
1. Make sure your FASTA card installed properly in PCI slot.
2. On step 4 - "Select Destination", please use default folder - "tmp". Do not change to any other folder or drive.

3. Restart computer and try again.
How to update S2VR Firmware? (using S2VR Duo as an example)
Read this first:
Incorrect or incomplete Firmware upgrades - for example applying the Firmware for the wrong model - can render your S2VR drive unusable.
For this reason, it's vital that you identify your model, its current Firmware and new firmware file before you proceed.
CalDigit periodically releases updates to the firmware in order to fix problems or to provide feature upgrades.
A notice of firmware updates may appear on the CalDigit FAQ and Support webpages, or you may be contacted via the email.
In the event of a firmware update, follow these steps.
1. Download and install the latest S2VR Manager.
Click here to download the latest version v1.0.2.
2. Download and unzip the latest firmware.
S2VR Duo - Firmware version 1.403
S2VR HD - Firmware version 1.2061
3. Launch the S2VR Manager (location: Applications/Utilities/CalDigitS2VR/S2VRManager).
4. Choose the target S2VR drive you want to upgrade. (the one with SN#)
5. From the File menu, select the first item: "Update Firmware...".

6. Select the firmware bin file you just download from CalDigit website then press the Open button.
S2VR HD and S2VR Duo have different Firmware files, you must choose the right firmware for the target device.

7. The connecting window will close as soon as the new Firmware has been downloaded to S2VR device.
Tip: Do not disconnect the S2VR drive from machine or unplug SATA cable while the S2VR Manager is updating the Firmware.
8. Click the Refresh button, S2VR Manager will retrieve the latest information from the target S2VR drive. Verify the new Firmware version showing on the screen.
How is the reliability of the S2VR series of solutions compared to Fibre Channel and SCSI storage solutions?
S2VR is as reliable as the much higher cost direct-attached FC storage. The
S2VR is also far more reliable than
the much higher cost SCSI-to-IDE Ultra 320 SCSI RAID storage solutions.
Ultra 320 SCSI rely on parallel transfer
and are very sensitive about their cable and connector quality.
Because S2VR is native SATA storage, it does not use bridging like
SCSI-to-IDE or FC-to-ATA, therefore the S2VR
can get the most out of the internal SATA 3.0 HDD's data transfer rate.
Even thought the band width of SATA 3.0G is bit smaller than Ultra 320 SCSI,
most of those FC or SCSI storage has
performance around 200MB/s per channel.
S2VR eliminates the interoperability problem and offers single vendor
support. Everything from host interface card,
internal RAID controller, software utility, driver and firmware are designed
and developed by
CalDigit. Most SATA storage solutions have to use justify their components
for the best cost per performance. But S2VR ultilizes
the most reliable components for daily use using reliable, quality
components.
Do you know what the standard maximum length of a eSATA to eSATA cable is?
The typical max length is 2 meters.
I would like to use the S2VR?ith?y G4 PCI machine, can the S2VR be used with my machine & would I experience slower performance?
Yes, you can use the S2VR on your G4 PCI machine, with our FASTA-4x (PCI-x Controller card) as PCI-x is downward compatible with PCI, but?erformance will be limited by the PCI bandwidth?o you would experience slightly slower performance. Also, the minimum system requirement for your G4 PCI machine running a S2VR? solution?ould be Mac OS 10.3.9.
If a drive fails how quickly can the drive re-build itself ?
Rebuild time for any product in the S2VR series is 250GB every 2 hours. Unlike other RAID's that may have to rebuild the whole RAID, our solution just rebuilds the drive that went bad. This revolutionary process saves you valuable time in the long run by just rebuilding what is bad, rather than rebuilding your entire RAID.
I am experiencing dropped frames while using Final Cut Pro. What
is causing this problem?
Check that these settings match the footage that you are using.
1. Easy Setup
2. Sequence Settings
Close any sequences that are not being used.
Delete the User Preference Files, Please refer to Apple Technical
Information Library: http://docs.info.apple.com/article.html?artnum=302337
How to use different sets of drives in S2VR?
1. Eject the drive from desktop. Open the "S2VR Manager" software.
2. Write down current RAID settings - Performance, Protected, JBOD and Turbo number for future reference.
3. Unplug existing drives one by one until you unpopulated/pull out all drive modules.
4. Wait for few seconds until S2VR Manager shows that all drives "unplugged.".
5. Click on "Change Project" button.

6. Wait few seconds; the S2VR Manager will automatically open a drawer where you can configure new RAID. At this moment, all selections and buttons are disabled and gray out.

7. Plug in the new set of drives. Wait few seconds until you see "Create New RAID" available.
8. Choose the RIGHT RAID settings for the new drives - Performance, Protected JBOD and Turbo number.
9. Click on "Create New RAID" button.

New drive should automatically show up on your desktop or OS. If not, please restart your OS. After "change project", DO NOT format or partition this drive unless you want to delete all the data.
How to setup Window RAID for S2VR HD?
https://archive.caldigit.com/WindowsRAID.asp